How to Draw a 4x12 Roof Plan
4×12 Gable Shed Roof Plans
This step past pace woodworking project is about iv×12 gable shed roof plans. This is the PART 2 of the 4×12 garden shed project, where I show you how to build the gable roof for the shed. Building the roof for the shed is really easy if y'all follow my tips and diagrams with attending. Read the local codes before starting the projection, so you lot comply with the requirements. See my other DIY projects HERE.
We recommend you lot to invest in the best materials you could afford. Therefore, you lot should buy conditions-resistant lumber, such as pine or cedar. Always have authentic measurements earlier adjusting the size of the components at the proper size. Drill pilot holes trough the components before inserting the wood screws, to prevent the woods from splitting. Encounter all my Premium Plans HERE.
Fabricated from this program
4×12 Gable Shed Roof Plans

Building a iv×12 shed
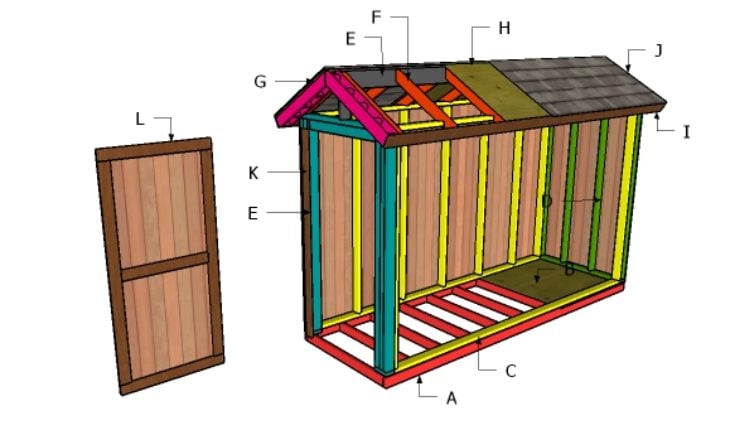
Materials
- D – 2 pieces of five/8″ T1-xi siding – fifteen 3/4″x48″ long SIDING
- Eastward – 2 pieces of two×4 lumber – 9 3/4″ long, 1 pieces of 2×six lumber – 144″ long RIDGE
- F – 14 pieces of 2×iv lumber – 35 1/iv″ long RAFTERS
- One thousand – 4 pieces of 2×four lumber – 35 ane/4″ long, 10 pieces – 2 1/2″ long OVENHANG
- H – two pieces of 3/iv″ plywood – 35 1/4″x96″ long, 2 pieces – 35 one/4″x96″ long, four pieces – 6″35 1/four″ long ROOF
- I – 2 pieces of 1×4 lumber – 156″ long TRIMS
- J – 120 sq ft of tar newspaper, 120 sq ft of asphalt shingles Covering
- thirteen pieces of 2×4 lumber – 6′
- one slice of 2×6 lumber – 12′
- 2 pieces of 1×four lumber – xiv′
- 2 pieces of 2×6 lumber – six′
- 3 pieces of 3/4″ plywood – 48″x96″
- 1 piece of T1-11 5/viii″ siding – 4'x8′
- 120 sq ft of tar paper, 120 sq ft of asphalt shingles
- 2 1/ii″ screws, 3 ane/2″ screws, 1 v/8″ screws
- 4d nails, 6d nails
- rafter ties
- shed hinges
- wood filler , wood glue, stain/paint
Tools
- Safe gloves, glasses
- Miter saw, jigsaw
- Chalk line, record measure, spirit level, carpentry pencil
- Drill mechanism and drill bits
Fourth dimension
- One week
4×12 Gable Shed Roof Plans

Fitting the ridge beam
Utilise 2×4 lumber for the supports. Drill pocket holes at both ends of the supports and lock them to the eye of the plates with 2 ½" screws. Fit the ridge beam and secure it to the supports with 2 ½" screws. Use a spirit level to check if the beam is horizontal.

Building the rafters
Use 2×4 lumber for the rafters. Mark the cut lines on the beams and then become the job done with a round saw. Polish the edges with sandpaper.

Fitting the rafters
Fit the rafters to the elevation of the shed. Identify the rafters every 24″ on middle, equally spaced, as shown in the diagram. Drill pilot holes and insert 3 1/2″ screws to lock the rafters into place tightly.

Gable ends
Use T1-11 siding sheets for the gable ends. Marker the cut lines on the sheets and then get the job done with a saw. Align the edges with attention and insert six-8d nails, every viii″ along the framing.

Building the overhangs
Build overhangs for the shed from 2×4 lumber. You can suit the size of overhangs to suit your needs. Drill pilot holes through the rafters and insert 2 one/2″ screws into the blocking.

Fitting the overhangs
Fit the overhangs to the front and to the back of the shed. Marshal the edges with attention, drill pilot holes and insert 2 one/2″ screws to lock them into place tightly.

Roof sheets
Fit 3/four″ plywood sheets to the roof of the shed. Marshal the sheets with attention, making sure you leave no gaps between them. Insert ane 5/8″ screws to lock the sheets into identify, every 8″ along the rafters.

Forepart and back wall trims
Use 2×6 lumber for the front and back roof trims. Cutting the trims as shown in the diagram. Attach the trims to the gable ends and and so lock them into place with 2 i/ii″ screws.

Side roof trims
Fit 1×6 trims to the sides of the roof. Align the edges with attention and and then insert ii″ nails to lock them into place tightly.

Fitting the roofing
Cover the roofing sheets with tar paper. Install the tar paper starting with the bottom of the roof and brand certain the strips overlap for at to the lowest degree 2″. In addition, fit a 12" strip over the superlative ridge. Install the shingles starting with the left- bottom of the roof, afterwards fitting the starting course. Use roofing tacks to secure the shingles into place.

four×12 shed plans – front view
This shed is narrow and it is ideal if you need storage space but you take a narrow backyard.

4×12 shed plans – back view
Make sure you have a look over Part 1 and Function three of the projection, then you learn how to build the frame and how to build the front door.
Thank you for reading our project near free 4×12 gable shed roof plansand I recommend you to bank check out the rest of the projects. Don't forget to LIKE and SHARE our projects with your friends, by using the social media widgets. SUBSCRIBE to be the first that gets our latest projects.
<< Previous | Next >>
Related Posts
Source: https://howtospecialist.com/outdoor/shed/4x12-gable-shed-roof-plans/
0 Response to "How to Draw a 4x12 Roof Plan"
Post a Comment